2. Creation of Retail Term Deposit Account
This process instigates with the receipt of the term deposit opening form and the related documents from a prospect / customer for opening of a term deposit. The bank verifies the details / documents submitted for opening of a term deposit to ensure completeness. In case of missing details / documents, the bank either decides to proceed further only after obtaining the missing details / documents or processes the request with necessary approvals without waiting for the missing details / documents.
The bank as well captures the details of the term deposit to be opened, which is followed by KYC checks. In case of an existing customer, the bank does the KYC checks only if there are any change in the existing KYC information of the customer and in case of a new customer the bank necessarily performs the KYC checks. If the KYC checks are not passed, the application is rejected. In case the prospect/customer passes the KYC checks, the bank creates a new customer record in case of a new customer / updates the customer details in case of an existing customer. The bank opens a term deposit in the relevant system and dispatches/hand over’s the term deposit receipt/confirmation advice to the customer.
This chapter contains the following sections:
- Section 2.1, "Stages in Retail Term Deposit Creation"
- Section 2.2, "Process Flow Diagram"
- Section 2.3, "Receive and Verify"
- Section 2.4, "Decide on Approval for Missing Documents / Details"
- Section 2.5, "Input Details"
- Section 2.6, "Verify Details of Input "
- Section 2.7, "Modify Details of Input"
- Section 2.8, "KYC (Retail) Review Info "
- Section 2.9, "Block Customer in the System"
- Section 2.10, "Generate Advice of Rejection of Request for Opening TD"
- Section 2.11, "Dispatch Advice of Rejection"
- Section 2.12, "Check if Funds are Available for Opening TD Account"
- Section 2.13, "Create Customer / Modify Customer Details in the System"
- Section 2.14, "Book Term Deposit"
- Section 2.15, "Generate Term Deposit Receipt / Confirmation Advice"
- Section 2.16, "Store Document Reference Number in the System"
- Section 2.17, "Dispatch Confirmation Advice and Store Documents "
- Section 2.18, "Limit Validation for TD Opening"
2.1 Stages in Retail Term Deposit Creation
In Oracle FLEXCUBE, the process for opening a retail term deposit is governed by several user roles created to perform different tasks. At every stage, the users (with requisite rights) need to fetch the relevant transactions from their task lists and act upon them. Similarly, at different times, the system will make calls to certain web services to process the transaction.
The retail term deposit opening process comprises the following stages:
- Receive and verify term deposit account opening form and other documents
- Decide on approval for missing documents / details
- Input details of term deposit
- Verify details of input
- Modify details of input
- Sub process – Know your customer (Retail) checks
- Block customer in Oracle FLEXCUBE
- Generate advice of rejection of request for opening of a term deposit
- Dispatch advice of rejection
- Check if funds are available for opening term deposit account
- Create customer / modify customer details in Oracle FLEXCUBE
- Book term deposit
- Generate term deposit receipt / confirmation advice
- Store document reference number in Oracle FLEXCUBE
- Dispatch confirmation advice and store documents collected from customer
Only users who have procured the relevant access rights can perform activities under a stage.
2.2 Process Flow Diagram

2.3 Receive and Verify
This section contains the following topics:
- Section 2.3.1, "Receive and Verify TD Account Opening Form and Documents"
- Section 2.3.2, "Capturing Primary Customer Details"
- Section 2.3.3, "Capturing Secondary Customer Details"
- Section 2.3.4, "Capturing Tertiary Customer Details"
- Section 2.3.5, "Uploading Documents"
2.3.1 Receive and Verify TD Account Opening Form and Documents
In this stage, the bank receives the term deposit opening form and the related documents from a prospect / customer for opening of a term deposit. The bank verifies the details / documents submitted for opening of a term deposit to ensure completeness. In case of missing details/documents, the bank either decides to proceed further only after obtaining the missing details/documents or processes the request with necessary approvals without waiting for the missing details/documents. The bank then captures the details of the term deposit to be opened, which is followed by KYC checks. In case of an existing customer, the bank does the KYC checks only if there are any change in the existing KYC information of the customer and in case of a new customer the bank necessarily performs the KYC checks. If the KYC checks are not passed, the application is rejected. In case the prospect/customer passes the KYC checks, the bank creates a new customer record in case of a new customer/ updates the customer details in case of an existing customer. The bank opens a term deposit in the relevant system and dispatches/hand over’s the term deposit receipt/confirmation advice to the customer.
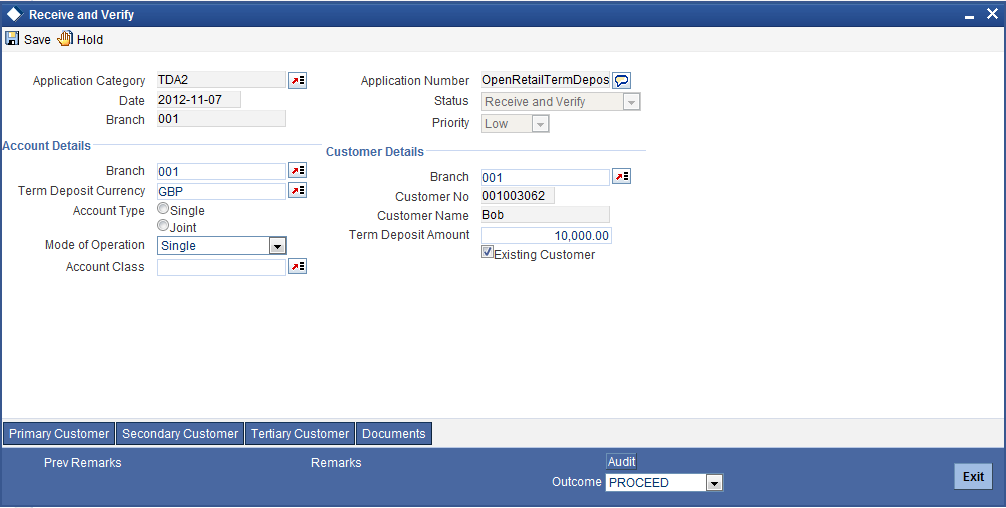
Users belonging to the user role RCSEROLE (Retail Customer Service Executive) can perform these activities. You can invoke this screen by typing ‘ORDTDAPP’ in the field at the top right corner of the Application tool bar and clicking the adjoining arrow button.
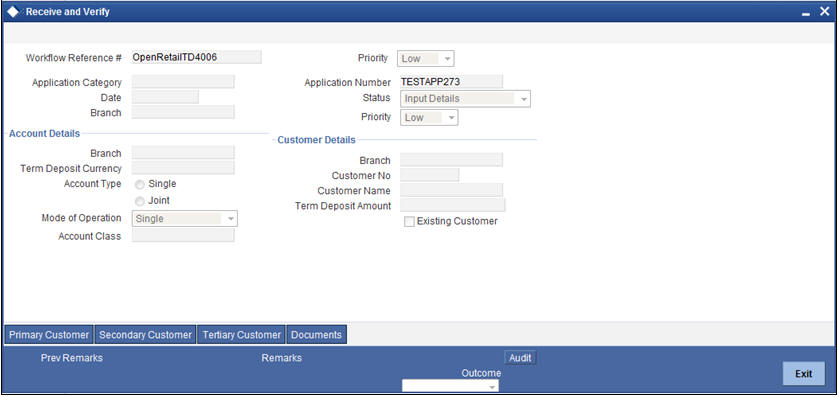
Specify the following basic details in this screen:
Application Category
Specify the application category to which the application belongs. The option list displays all valid application categories maintained in the system. Choose the appropriate one.
Application Number
The system displays the application number.
Date
The system displays date of application.
Branch
The system displays the branch code.
Status
The system displays the current status of the application.
Priority
Select the priority for the creation of the term deposit account for a customer from the adjoining drop-down list. This list displays:
- Low
- Medium
- High
Account Details
Capture the basic account details of the customer here:
Branch Code
The current logged in branch is displayed here.
Term Deposit Currency
Specify the currency of the customer account. You can also select the appropriate currency from the adjoining option list. The list displays all the valid currencies maintained in the system.
Account Class
Specify the account class to be used by the account. You can also select the appropriate account class from the adjoining option list. The list displays all the valid account classes maintained in the system. You can choose the appropriate one.
Account Type
Select the account type from the drop-down list. You can choose one of the following account types:
- Single
- Joint
Mode of operation
Select mode of operation from the drop-down list. The options available are:
- Single
- Jointly
- Either – Any one or Survivor
- Former or Survivor
- Mandate Holder
Branch
Specify the home branch code of the customer. The option list displays all valid branch codes available in the system. Choose the appropriate one.
Customer No
Specify a valid customer number. For new customer the user needs to specify the customer number here. You can also select the appropriate customer number from the adjoining option list. The list displays all valid individual category customers maintained in the system.
Customer Name
The name of the selected customer is displayed here. In case of new customers it is blank.
Term Deposit Amount
Specify the term deposit amount.
Maturity Date
Specify the maturity date from the option list.
Existing Customer
Check this option if the selected customer is an existing customer.
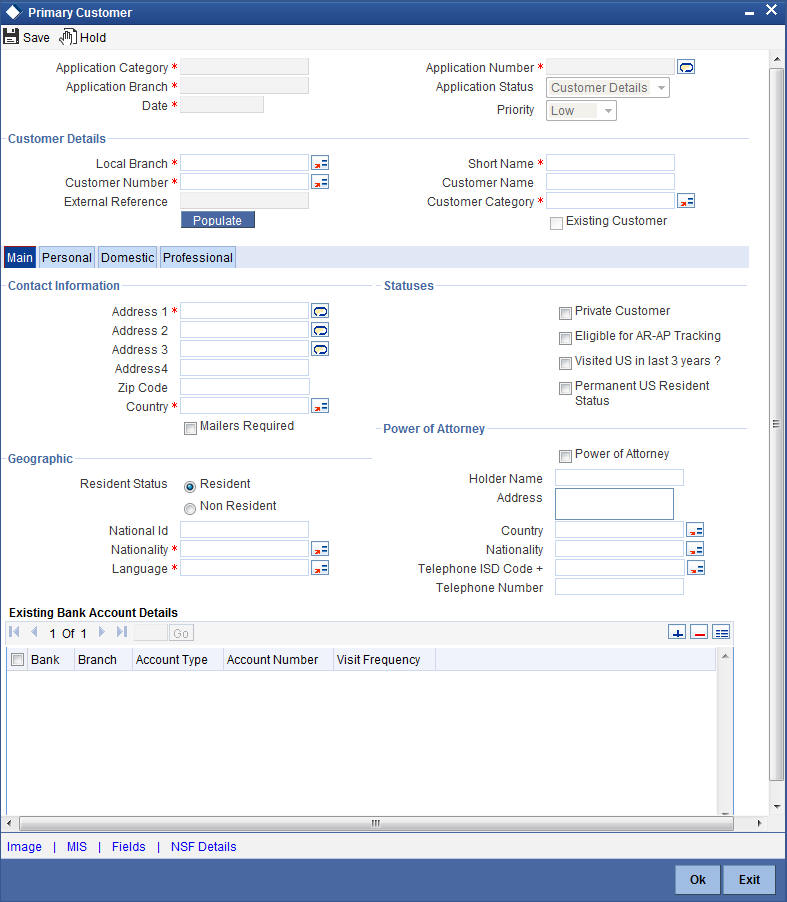
2.3.2 Capturing Primary Customer Details
Click ‘Primary Customer’ button to capture customer details. The following screen is displayed:

Here you can maintain the following details:
Application Category
Specify the application category to which the application belongs. You can select the appropriate application category from the option list.
Application Number
The system displays the application number.
Application Branch
Specify the displays the branch code. You can select the appropriate application branch from the option list.
Date
The system displays date of application.
Application Status
The system displays the current status of the application.
Priority
The system displays the priority of the term deposit account creation. Priority can be one of the following:
- Low
- Medium
- High
Customer Details
In this section, maintain the following basic customer details:
Local Branch
The system displays the branch code of the local branch of the customer.
Customer Number
The customer number is displayed here.
Short Name
Specify the short name of the customer.
Customer Name
Specify the full name of the customer.
External Reference
The system displays the external reference, if any.
Customer Category
The system displays the customer category to which the customer belongs.
Existing Customer
If this field is checked in the ‘Receive and Verify’ screen, then the same is displayed here. You can click ‘P’ button to display the customer details in the ‘Customer Details’ screen.
Contact Information
Adderss
Specify the address of the customer.
ZIP Code
Specify the ZIP code that forms a part of the address.
Country
Specify the code that identifies the country of the customer. You can choose the appropriate country code from the option list.
Mailers Required
Check this box to enable mailers.
Statuses
Private Customer
Check this box to indicate that the customer is a private customer.
Eligible for AR-AP Tracking
Check this box to indicate that the customer is eligible for AR-AP tracking.
Permanent US Resident Status
Check this box to indicate that the corresponding director is a permanent US resident.
Visited US in last 3 years?
Check this box to indicate that the beneficial owner has visited US in the last three years.
Geographic
Residential Status
Specify the residential status of the customer. You can select one of the following residential statuses:
- Resident
- Non Resident
National ID
Specify the national ID of the customer.
Nationality
Specify the nationality of the customer. You can choose the appropriate nationality code from the option list.
Language
Specify the language to be used for communications with the customer. You can choose the appropriate language code from the option list.
Power of Attorney
Note
If the FATCA is enabled at the bank and the check box 'Power of Attorney' is checked here, then it is mandatory to specify the Power of Attorney information.
Power of Attorney
Check this box to indicate that the customer account is to be operated by the power of attorney holder.
Holder Name
The person who has been given the power of attorney.
Address
Specify the address of the power of attorney holder.
Country
Specify the country of the power of attorney holder.
Nationality
Specify the nationality of the power of attorney holder.
Telephone ISD Code +
Specify the international dialling code for the telephone number of the power of attorney holder. The adjoining option list displays valid ISD codes maintained in the system. Select the appropriate one.
Telephone Number
Specify the telephone number of the power of attorney holder.
Existing Bank Account Details
You can capture the following details of existing bank accounts of the customer.
Bank
Specify the name of the bank with which the customer has an existing account.
Branch
Specify the branch of the above bank, with which the customer has an existing account.
Account Type
Specify the type of existing account of the customer.
Account Number
Specify the account number of the existing account of the customer.
Visit Frequency
Specify the frequency of customer visit to the bank, for the account mentioned above.
For new customers all the details mentioned above have to be manually input.
2.3.3 Capturing Secondary Customer Details
Click ‘Secondary Customer’ button to capture customer details. The following screen is displayed:
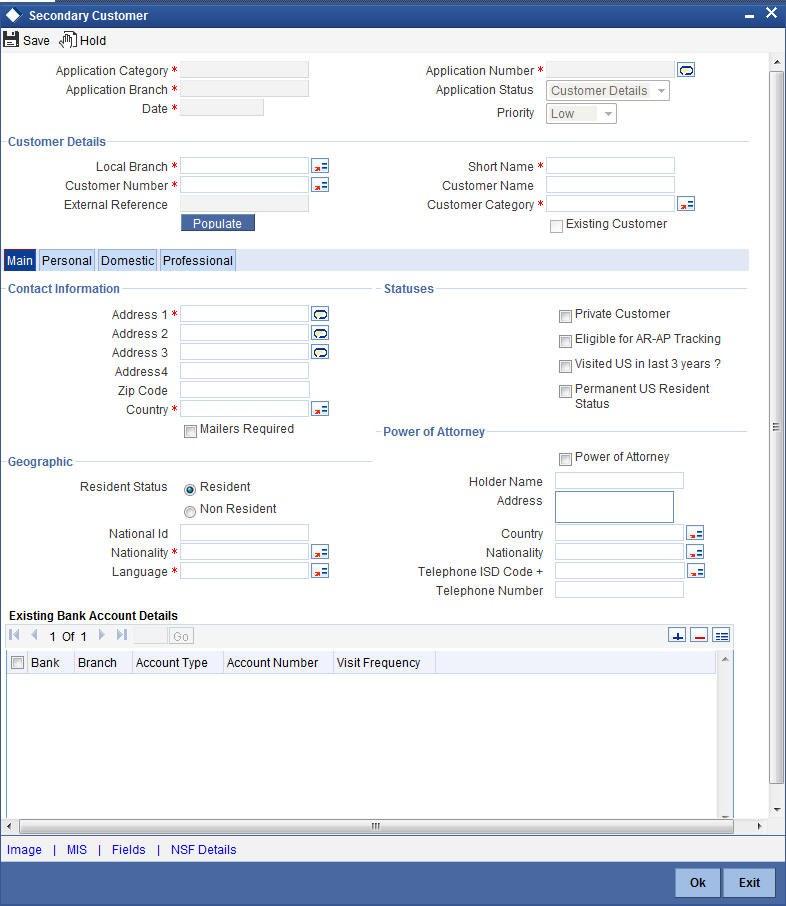
For further details, refer to the section ‘Capturing Primary Customer Details’ in this chapter.
2.3.4 Capturing Tertiary Customer Details
Click ‘Tertiary Customer’ button to capture customer details. The following screen is displayed:
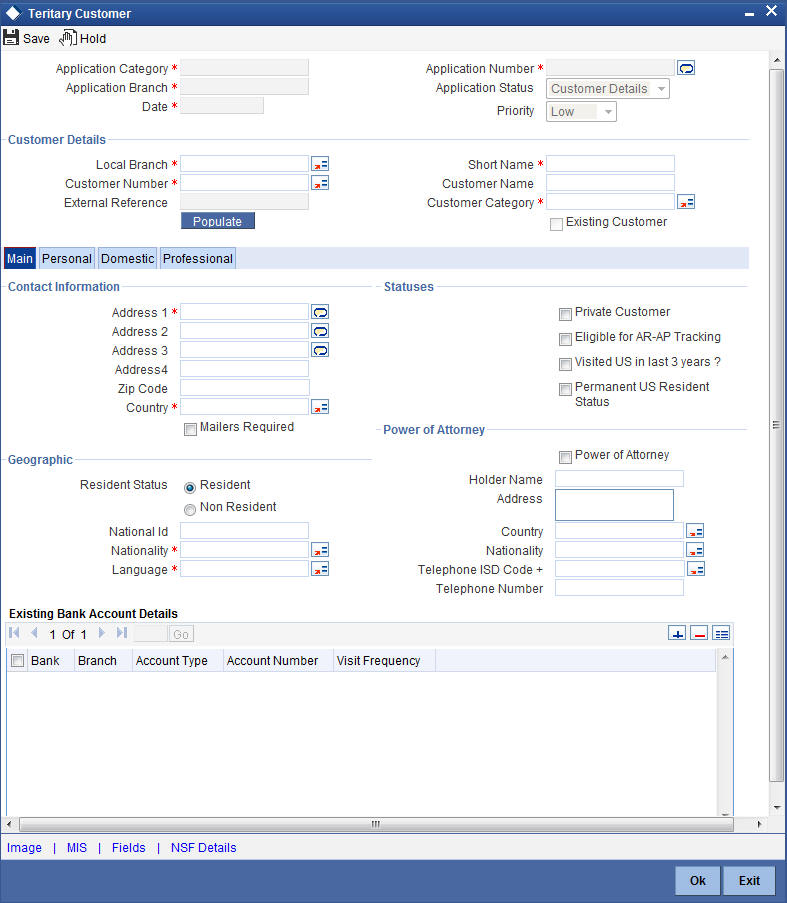
For further details, refer to the section ‘Capturing Primary Customer Details’ in this chapter.
2.3.5 Uploading Documents
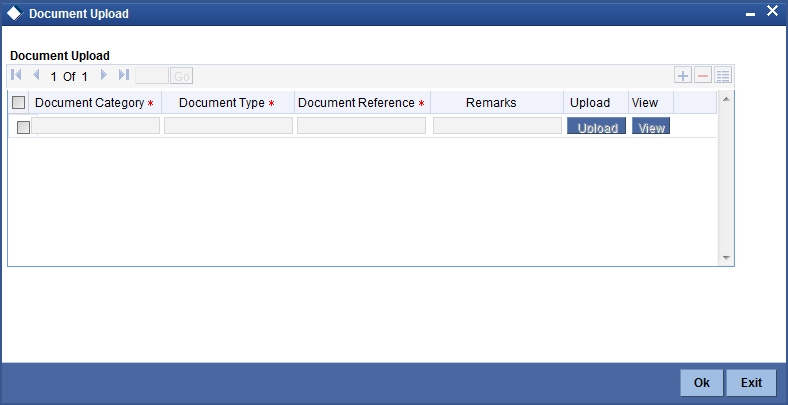
You can capture the customer related documents in central content management repository through the ‘Documents’ screen. Click ‘Documents’ button to invoke this screen.
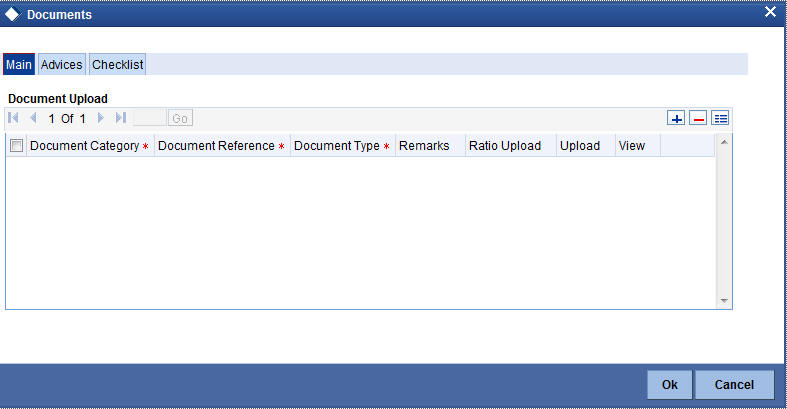
Here, you need to specify the following details:
Document Category
Specify the category of the document to be uploaded.
Document Reference
The system generates and displays a unique identifier for the document.
Document Type
Specify the type of document that is to be uploaded.
Upload
Click ‘Upload’ button to open the ‘Document Upload’ sub-screen. The ‘Document Upload’ sub-screen is displayed below:
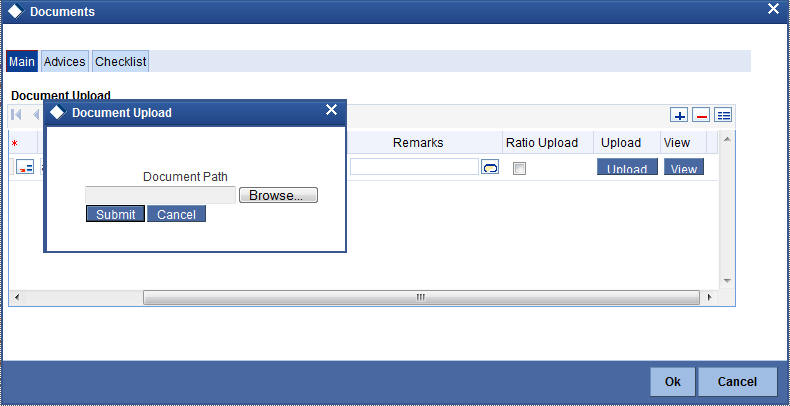
In the ‘Document Upload’ sub-screen, specify the corresponding document path and click the ‘Submit’ button. Once the document is uploaded through the upload button, the system displays the document reference number.
View
Click ‘View’ to view the document uploaded.
In ‘Retail Term Deposit Creation’ process, ‘Document Upload’ feature is not available in all the stages. Its availability in this process is given below:
| Stage Title | Function ID | Callform Exists | Upload(Available/Not available) | View(Available/Not available) | |||||
|---|---|---|---|---|---|---|---|---|---|
| Receive and verify term deposit account opening form & other documents | ORDTDAPP | Available | Available | Available | |||||
| Decide on approval for missing documents / details | ORDTDRCV | Available | Available | Available | |||||
| Input details of term deposit | ORDTDINP | Not Available | |||||||
| Verify details of input | ORDTDVER | Not Available | |||||||
| Modify details of input | ORDTDMFY | Not Available | |||||||
| Sub process – Know your customer(Retail) checks | |||||||||
| KYC Failure | |||||||||
| Generate advice of rejection of request for opening of a term deposit | |||||||||
| Dispatch advice of rejection | ORDTDADV | Not Available | |||||||
| Check if funds are available for opening term deposit account | ORDTDCHK | Not Available | |||||||
| Create customer / modify customer details in FLEXCUBE | ORDTDSAV | Available | Available | Available | |||||
| Book term deposit | ORDTDSAV | Not Available | |||||||
| Generate term deposit receipt / confirmation advice | ORDTDSAV | ||||||||
| Store document reference number in FLEXCUBE | CSCDOCUP | Available | Not Available | Available | |||||
| Dispatch confirmation advice and store documents collected from customer | ORDTDDOC |
2.4 Decide on Approval for Missing Documents / Details
In this stage, the bank decides whether to approve processing the term deposit opening request as an exception, if the account opening with incomplete details / documents as an exception is approved. If the opening of term deposit with incomplete details/documents as an exception is approved, the bank proceeds with processing the request and simultaneously arranges to follow up with the customer for submission of the pending details / documents. The decision/remarks of the approver are captured.
In this screen you can view the basic account, customer and document details. The verifier should be able to view the contents of the document uploaded.
Users belonging to the user role RCSMROLE (Retail Customer Service Manager) can perform these activities.
Go to the pending list in the system. The system displays all the pending activities. Click ‘Acquire’ button adjoining the ‘Approve Account Opening’ task to acquire it. The system displays the information message as “...xxx Accquire Successful”
If you have requisite rights, double click on the task in your ‘Assigned’ task list and invoke the following screen:
After viewing the details, if you want to obtain the missing documents before approval, then select the action ‘Obtain Missing Documents’ in the text box adjoining the ‘Audit’ button. You will be taken back to ‘Receive and Verify’ screen. However, if you want to proceed with the process of account creation, select the action ‘APPROVE’ in the text box adjoining the ‘Audit’ button. You will be taken to ‘Input Details’ task. Click save icon in the tool bar. The system displays a message ‘The task is completed successfully.
Click ‘OK’ button on the message screen. You will be taken back to the ‘Approve Account Opening’ screen. Click ‘Exit’ button to exit the screen. The task is then moved to the next activity.
2.5 Input Details
This section contains the following topics:
- Section 2.5.1, "Input Details of Term Deposit"
- Section 2.5.2, "Specifying Main Details"
- Section 2.5.3, "Specifying Nominee Details"
- Section 2.5.4, "Specifying Interest Details"
- Section 2.5.5, "Specifying Rollover Details"
- Section 2.5.6, "Specifying MIS Details"
- Section 2.5.7, "Viewing Change Log"
- Section 2.5.8, "Viewing Balance Transfer Log"
- Section 2.5.9, "Specifying Interest Payout Details"
- Section 2.5.10, "Capturing Primary Customer Details"
- Section 2.5.11, "Capturing Primary Customer Main Details"
- Section 2.5.12, "Capturing Primary Customer Personal Details"
2.5.1 Input Details of Term Deposit
In this stage, the bank captures the complete details required for opening of a term deposit such as customer information (details of all the applicants in case of joint accounts), contact details, deposit amount, tenor/ maturity date, nominee details, guardian details (in case of minor accounts / nominees), rollover details. The bank also uploads signature and photographs of the prospect/customer.
Users belonging to the user role ROEROLE (Retail Operations Executive) can perform these activities. The function ID of this stage is ORDTDINP.
Go to the pending list in the system. The system displays all the pending activities. Click ‘Acquire’ button adjoining the ‘Input Details’ task to acquire it. The system displays the information message as "...xxx Accquire Successful"
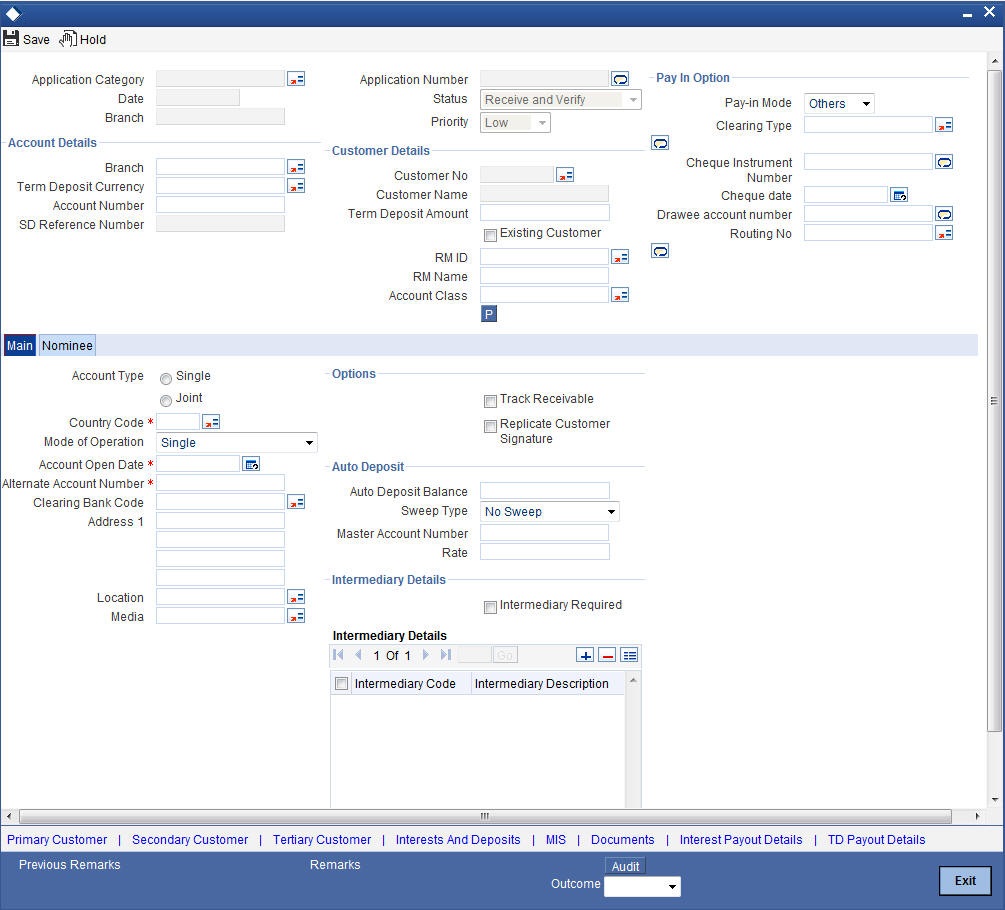
If you have requisite rights, double click on the task in your ‘Assigned’ task list and invoke the following screen:
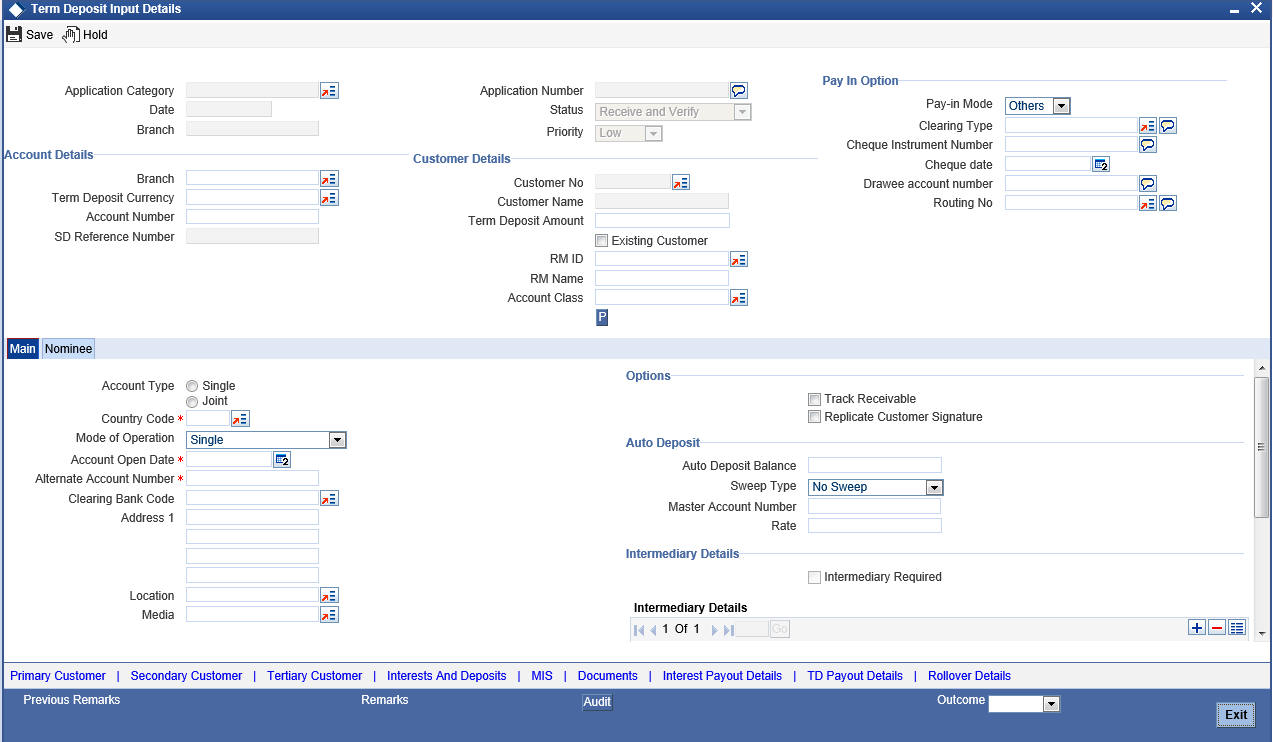
Here you can specify the following details:
Application Category
The system displays the application category to which the application belongs.
Application Number
The system displays the application number.
Branch
The system displays the branch code.
Date
The system displays date of application.
Status
The system displays the current status of the application.
Priority
The system displays the priority of the term deposit account creation. Priority can be one of the following:
- Low
- Medium
- High
Account Details
Specify the following account details of the customer in this section:
Branch Code
The current branch in which the account is being created is displayed.
Term Deposit Currency
Specify the currency to be used for the account. You can also select the account currency from the adjacent option list. The list displays all the currencies maintained in the system.
Account Number
Specify the account number of the customer from which the initial deposit is made.
SD Reference Number
The system displays the SD reference number.
Customer Details
Specify the following details:
Customer No
The system displays the customer number.
Customer Name
The system displays the name of the customer.
Existing Customer
This field is checked if this option was checked in the ‘Receive and Verify’ screen.
Account Class
Specify the account class for the account. You can also select the account class from the option list provided. The list displays all the account classes maintained in the system. Select and click the appropriate account class. All the facilities maintained for the account class will be applicable for the current account to be created.
Pay In Option
Specify the following details:
Pay–in Mode
Select the term deposit pay in option from the drop-down list. The options available are:
- Cheque
- Others
Clearing Type
Specify the clearing type. You can choose the appropriate clearing type from the option list.
If the pay-in mode is ‘Cheque’, it is mandatory to specify the clearing type.
Cheque Instrument Number
Specify the cheque number if the initial deposit is made through cheque.
If the pay-in mode is ‘Cheque’, it is mandatory to specify the cheque instrument number.
Cheque Date
Specify the date of the cheque.
If the pay-in mode is ‘Cheque’, it is mandatory to specify the cheque date.
Drawee Account Number
Specify the drawee account number.
If the pay-in mode is ‘Cheque’, it is mandatory to specify the drawee account number.
Routing Number
Specify the routing number. You can choose the appropriate routing number from the option list.
If the pay-in mode is ‘Cheque’, it is mandatory to specify the routing number.
2.5.2 Specifying Main Details
Click ‘Main’ Tab to enter the following details:
Account Type
Select the account type from the drop-down list. The options available are:
- Single
- Joint
Country Code
Specify the country code. You can choose the appropriate country code from the option list.
Mode of Operation
Select mode of operation from the drop-down list. The options available are:
- Single
- Jointly
- Either – Any one or Survivor
- Former or Survivor
- Mandate Holder
Account Open Date
Specify the date on which the account was opened.
Alternate Account Number
Specify the alternate account number, if any.
Clearing Bank Code
Specify the clearing bank code. The option list displays all valid clearing bank codes maintained in the system. Choose the appropriate one.
Address
Specify the address of the customer.
Media
Specify the media. You can also select the media from the option list provided. The list displays all the media maintained in the system. Select and click the appropriate media.
Options
Track Receivable
Check this box to track the receivables.
Replicate Customer Signature
Check this box to replicate the customer signature.
Auto Deposit
Auto Deposit Balance
Specify the auto deposit balance.
Sweep Type
Specify the sweep type. The drop-down list displays the following options:
- No Sweep
- Default from Account
Master Account Number
Specify the master account number.
Rate
Specify the rate.
Intermediary Details
Intermediary Required
Check this box to indicate that intermediary is required. If you do not check this box, the system will not allow you to specify the other intermediary details.
Intermediary Code
Specify the intermediary code. The option list displays all valid and active intermediary codes maintained in the system. Choose the appropriate one.
You can specify the intermediary code, only if you have checked the box ‘Intermediary Required’.
Intermediary Description
Based on the intermediary code selected, the system displays the description of the intermediary.
Intermediary Ratio
If there are multiple intermediaries, you need to specify the ratio of individual intermediary contribution toward the TD amount.
2.5.3 Specifying Nominee Details
Click on ‘Nominee’ tab to specify the following details:
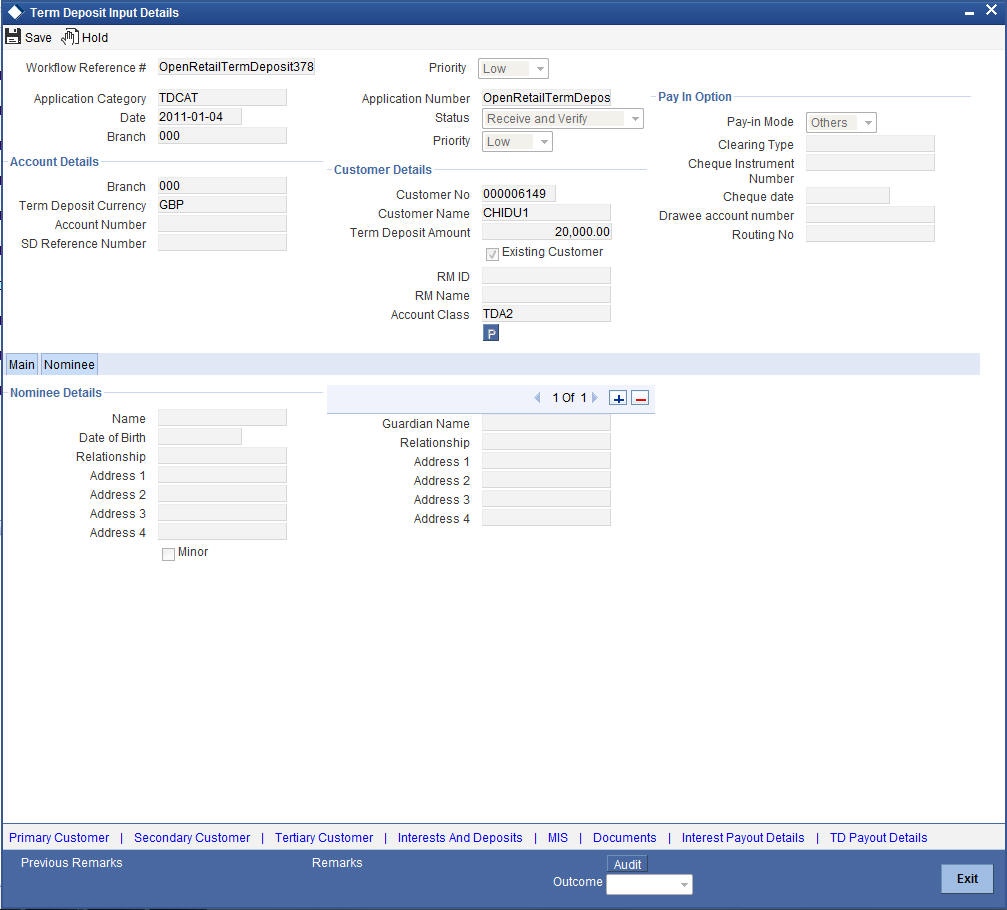
Specify the following details:
Nominee Details
Name
Specify the name of the nominee.
Date of Birth
Specify the date of birth of nominee.
Relationship
Specify the relation of the customer with the nominee.
Address1
Specify the first line of the address of the nominee.
Address2
Specify the second line of the address of the nominee.
Address3
Specify the third line of the address of the nominee.
Address4
Specify the forth line of the address of the nominee.
Minor
Select this option if the nominee is a minor.
Guardian Details
Guardian Name
Specify the guardian name of the minor.
Relationship
Specify the relation of the minor with the guardian.
Address1
Specify the first line of the address of the guardian.
Address2
Specify the second line of the address of the guardian.
Address3
Specify the third line of the address of the guardian.
Address4
Specify the forth line of the address of the guardian.
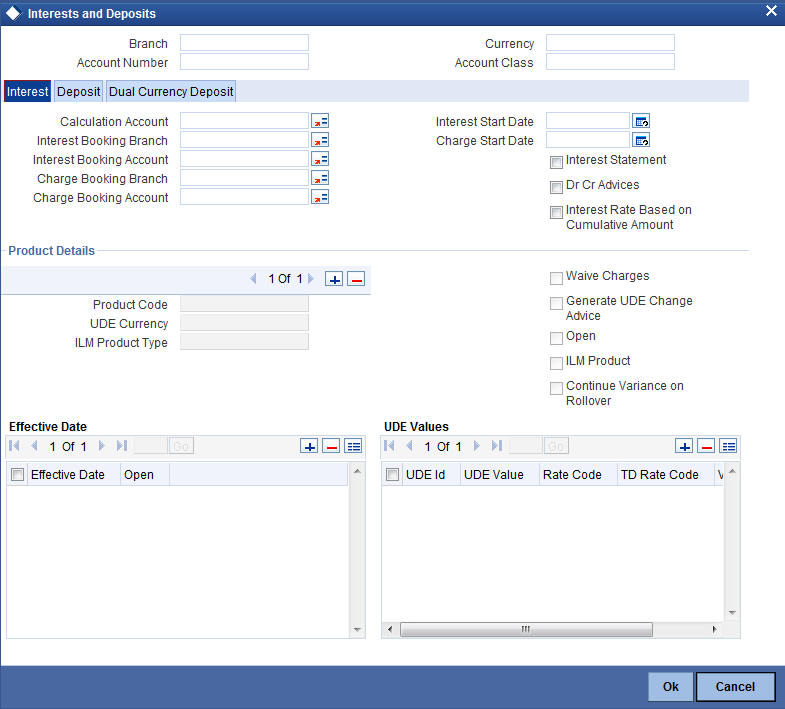
2.5.4 Specifying Interest Details
Enter interest details by invoking the ‘Interest and Deposits’ screen. Click ‘Interest and Deposit’ button to invoke this screen
Click ‘Deposit’ tab to input deposit details. The screen is displayed below:
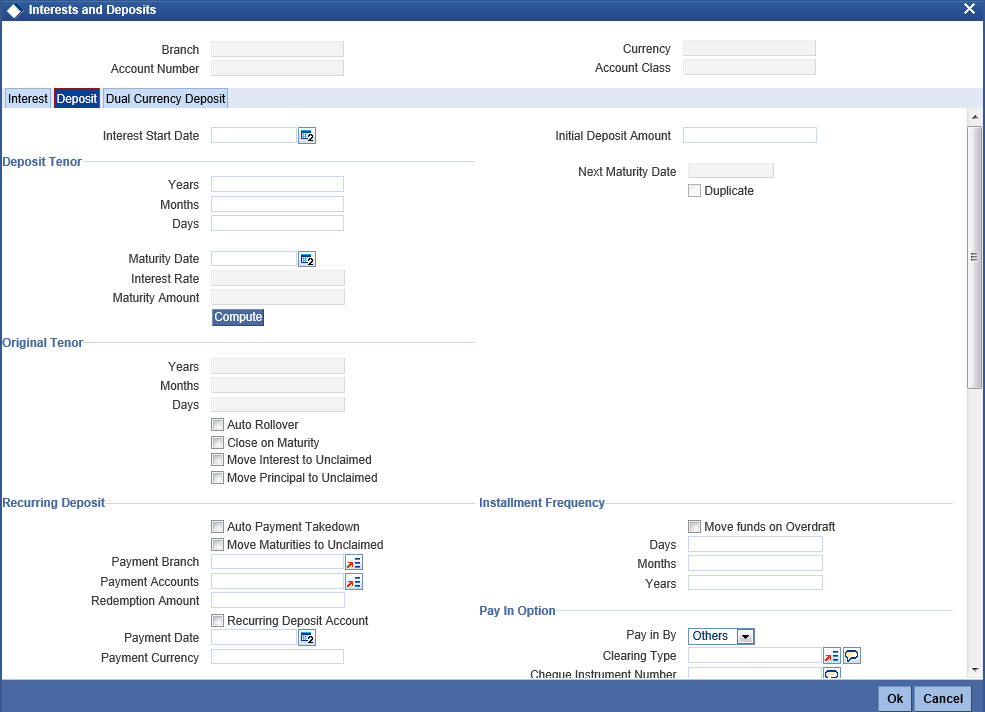
In this screen, you can view the interest rate and the maturity amount, at any stage of term deposit account opening.
You can also specify the term deposit payout details under this tab.
Specify the following details:
Deposit Tenor
The system calculates the tenor of the deposit account to the difference between Interest start date and Maturity date and displays it. In case of change in maturity date, the system changes the deposit tenor.
However, system allows you to specify a different tenor for payout term deposits. You can indicate the deposit tenor for the payout TD by selecting one of the following options:
- Account Class Tenor - If you select this option, then system defaults the account class deposit tenor for the payout TD during payout TD creation.
- Account Tenor - If you select this option, then the original deposit tenor of the parent TD is considered as the deposit tenor for the payout TD. By default, this option is selected.
- Independent Tenor - If you select this option, then you can specify a different TD represented in terms of years, months and days.
Note
System validates that the deposit tenor is within the minimum and maximum tenor allowed for the account class. If this validation fails, then system displays the error message, “Rollover tenor does not fall in the range of minimum and maximum tenor allowed”.
You can modify the default tenor during the following:
- Deposit account opening
- Any time before maturity during the life cycle of the deposit
- On rollover of the deposit
If you specify the tenor, the system computes the maturity date. Once the record is authorized, you cannot amend the tenor.
The deposit tenor is represented in terms of years, months and days. For example, if the deposit tenor is 185 days, it should be represented as 0 years, 6 months and 5 days. You need to specify the values in the appropriate fields.
Years
This indicates the number of years in the deposit tenor.
Months
This indicates the number of months in the deposit tenor.
Days
This indicates the number of days in the deposit tenor.
Original Tenor
The system displays the default tenor or the tenor specified at account which is arrived before the holiday movement.
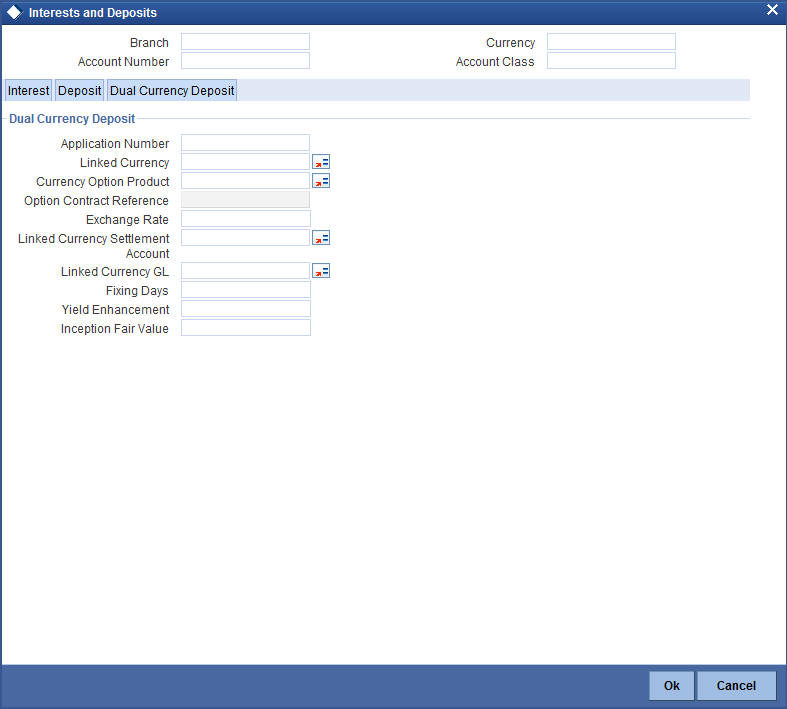
Click ‘Dual Currency Deposit’ tab to specify the dual currency deposit details.
Refer the ‘Applying Interest Product on Account’ chapter in the ‘Interest and Charges’ User Manual for details about applying interest to an account.
2.5.5 Specifying Rollover Details
You can capture Rollover Details in the ‘TD Rollover Details’ screen. To invoke this screen click the button ‘Rollover Details’ on ‘Deposit Account Booking’ screen.
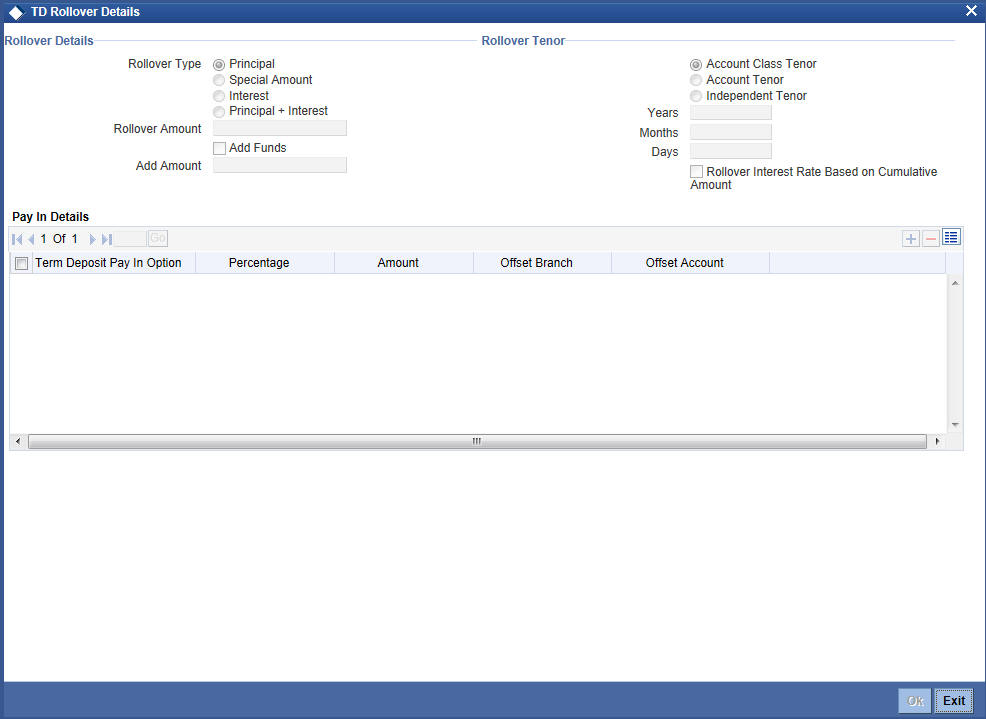
You can specify the following details here:
Rollover Details
Rollover Type
Select the component that should be rolled over. The options are as follows:
- Principal - To roll over the principal amount alone on TD maturity date or end of the grace period. If a CASA account is specified as the interest booking account, interest will be liquidated to that account. However, if the interest booking account is given as TD account, then it is mandatory to specify the interest payout account. On interest liquidation cycle, the interest will be booked on the TD and paid out to the interest payout account. On maturity date, the interest amount will be first liquidated to the TD account and then settled as per the pay-out details maintained for the TD account. Thus the principal alone is rolled over.
- Principal + Interest - To rollover the principal and interest amount on TD maturity date. You can choose this option only if the interest booking account is TD account. Payout details should not be specified.
- Special Amount - To roll over the amount specified in 'Rollover Amount' field, irrespective of the interest booking account. Upon maturity of the rolled over TD, the system will roll over with the same amount special amount and settle the interest amount as per TD pay-out details maintained.
- Interest - To roll over the interest amount on TD maturity date.You can choose this option only if the interest booking account is TD account. You should specify the principal payout account and leave the interest payout account. The principal will be settled as per the pay-out details maintained. This option is not allowed for discounted deposits.
Note
- If the Close on Maturity option is checked then, the system will select the option ‘Principal’ and disable this field.
- Add funds & add amt can be specified any time during lifecycle of TD. TD account can be modified & additional amount can be provided.If due to insufficient funds, the add amount cannot be debited on rollover, then rollover will fail. This will be retried till the funds becomes available and when funds becomes available, the TD Account will be rolled with add funds with maturity date as value date.
- The additonal funds will take effect only at the time of rollover..If rollover is with Principal / Principal+Interest / Interest, then user has to manually check the add funds & specify the additional amount.
- For rollover types Principal / Principal + interest & interest, add funds specified will be directly applied in addition to rollover amount & TD will get rolled with add funds
- If additional amount is specified, then add pay in details are mandatory. If not, error will be thrown on save.
- If rollover is special amount, then based on the rollover amount, the add funds & additional amount will get populated .user should not input add funds & amount for special amnt. If rollover amount is more than the Maturtiy amount (P+I), then Rollover amount -Maturity amnt will be populated as add amount & add funds will gets checked automatically.In this case, rollover amount can be more than the maturity amount.
- Add amount populated once for a special amount rollover TD will not be changed. If TD account is topped up / redeemed, it will be updated only when rollover amount is changed at rollover details subsystem
- If due to Top up, the TD amount becomes more than the rollover amount, then excess of rollover amount less maturity amount will be paid out. For special amount rollover TD, even if rollover amount is more than maturity amount, payout is mandatory.
In case of Discounted Interest, only Principal can be rolled over. The ‘Cumulative’ option is not allowed. The interest computed during deposit booking with discounted option will be paid to the interest booking account. When ‘Amount block’ option is checked at the product level, the amount block will be created on the TD account to the extent of the credited discounted interest. This amount block will use the Hold Code which has ‘Hold Type’ as Discounted TD in the ‘Hold Maintenance’ screen. This is to safeguard the bank from withdrawal of interest by the customer. The amount block created automatically by the system can be manually removed in case of premature closure. Closure is allowed on the amount blocks manually and amendment of these amount blocks is not allowed. TD amount blocks will be available in the ‘Amount Block Input’ screen.
Note
If 'Close on Maturity' option is checked and there is an amount of TD blocked, then the TD will be forcibly rolled over on the maturity date. However, the maturity instruction on the TD account will not be altered.
Rollover Amount
Specify the special amount to be rolled over.
Add Funds
Check this box to add additional funds for rollover.
Add Amount
Specify the additional amount to be considered for rollover in TD account currency.
Note
'For Rollover Type, ‘Special Amount’, ‘Add Funds’ and ‘Add Amount’ fields will be auto populated.
- If the user specifies higher amount, the ‘Add Funds’ gets updated as ‘Yes’ and ‘Add Amount’ will be updated as the difference between special rollover amount and TD maturity amount (P+I) on Save of TD booking. The additional amount field will not be updated on subsequent events in the TD. Any difference amount after rollover will be transferred to the principal payout account.
- If Rollover amount specified is lower than TD amount, the difference will be paid out.In this case, ‘Add Funds’ and ‘Add Amount’ will not be auto populated.
Rollover Tenor
Select the rollover tenor for the TD account. This is mandatory if ‘Auto Rollover’ box is checked. The options are as follows:
- Account Class Tenor - If ‘Re-pick up Account Class Tenor on Rollover’ is set to ‘Yes’ at the account class level, then on selecting rollover, the rollover tenor will be defaulted as account class tenor.
The default account class tenor is displayed as tenor in days, months and years which you cannot change. However, you can change the default option during rollover. When you save it, the system displays an override message ‘Re-pick account class tenor on rollover restrictions exists at account class’.
If ‘Re-pick up Account Class Tenor on Rollover’ is checked at the account class level, then by default, this option is selected. If you select this option, then the following are applicable:
- The value of ‘Default Tenor’ at account class is considered as the ‘Rollover Tenor’ during deposit rollover
- During opening or modification within the term of the deposit, if you change the defaulted value for ‘Rollover Tenor’ from ‘Account Class Tenor’ to ‘Account Tenor’ or ‘Independent Tenor’, then on save system displays an override message.
- On save, Maturity Date’ will not be displayed.
- Account Tenor - If Re-pick up Account Class Tenor on Rollover is set to ‘No’ at the account class level, then on selecting rollover, the rollover tenor will be defaulted as account tenor.
On rollover, the system displays the original tenor of the TD in terms of days, months and years. However, you can change the default option during rollover. When you save it, the system displays an override message ‘Re-pick account class tenor on rollover restrictions exists at account class’. If ‘Re-pick up Account Class Tenor on Rollover’ is unchecked at the account class level, then by default, this option is selected. If you select this option, then the following are applicable:
- The value of ‘Original Tenor’ of the deposit account is considered as the ‘Rollover Tenor’ during deposit rollover.
- During opening or modification within the term of the deposit, if you change the defaulted value for ‘Rollover Tenor’ from ‘Account Tenor’ to ‘Account Class Tenor’, then on save system displays the override message, “Re-pick up Account Class Tenor on Rollover restrictions at account class will be ignored”.
- On save, system updates the ‘Next Maturity Date’ with the sum of maturity date and original tenor of the deposit.
- Independent Tenor - Select this option to provide a different tenor, other than default from account class or account tenor. On selecting this option, you can specify the Rollover Tenor in years, months and days combination.
The tenor should be specified within the minimum and maximum tenor limits maintained at the account class level. If it is not within the minimum and maximum limit, then the system will display an error message "Rollover tenor does not fall in the range of minimum and maximum tenor allowed”. The rollover tenor for independent tenor should not be null.
On save, system updates the ‘Next Maturity Date’ accordingly.
Note
System validates that the rollover tenor is within the minimum and maximum tenor allowed for the account class. If this validation fails, then system displays the error message, “Rollover tenor does not fall in the range of minimum and maximum tenor allowed”.
The next maturity date will be adjusted based on the holiday treatment at account class level. The tenor in ICDREDMN screen will remain the same after holiday adjustment. On query from STDCUSTD after rollover, Deposit tenor will be populated with the holiday adjusted tenor and original tenor with the actual tenor before holiday adjustment.
Years
Specify the number of years in the rollover tenor.
Months
Specify the number of months in the rollover tenor.
Days
Specify the number of days in the rollover tenor.
Rollover Interest Based on Cumulative Amount
Check this box to arrive at the rollover interest rate of a new deposit using the cumulative amount of other active deposits, under the same account class and currency.
Note
- If this box is checked, then the rolled over deposit will earn a cumulative interest rate corresponding to the slab based on all active deposits of the customer.
- This selection can be modified any time during the life cycle of TD. The modification will take effect only on next rollover. The rollover interest rate based on cumulative amount flag will be defaulted on rollover to the 'Interest rate based on Cumulative amount' flag at interest subsystem.
- Rollover interest rate based on cumulative amount can be ‘No’, if interest rate based on cumulative amount is ‘Yes’ and vice-versa.
- Rollover interest rate based on cumulative amount can be checked only for rollover TDs and not for close on maturity and unclaimed TDs.
- Cumulation feature is not supported for recurring deposits, discounted deposits, fixed rate deposits and IC rate code deposits.
Payin Details
Select the Payin Details for debiting the additonal amount for rollover from the drop down list. The list displays the following values:
- GL - In case of pay-in through GL, if the offset GL account is not specified, the list displays the GL maintained at 'TD Payin Parameters' (STDTDPAY) screen and should be specified. If not specified, then GL at STDTDPAY will be defaulted and used on save of TD. The payin mode and Add Funds specified will be debited only on rollover
- Account - In case of pay-in from savings account, it is mandatory
to specify the offset account. If it is not specified, the system displays
an error on saving the TD account. If the pay-in account specified is
disallowed for the TD product, then on saving the account, the system
displays an error message
- If the offset account is not specified then, an error message is displayed as : “Offset account is mandatory.”
- Before rollover, the customer has to manually verify the availability of funds in the offset account. If not the rollover will fail. If the offset account does not have sufficient funds then the system will display an error as ‘Insufficient balance in the account.
If the offset account provided has limits attached, then on save the system will display a mes
sage as “The limits/Collateral attached is used for Payin.”
Percentage
Specify the percentage of payout for each payout option specified.
Amount
Specify the amount to be transferred to TD.
Offset Branch
The system displays the branch code of the account to which fund is transferred from TD account.
Offset Account
Specify the account number/ GL from which the fund is transferred to TD account on rollover. This field will return the branch code if the account is selected and NULL will be returned if GL is selected. If pay-out mode is GL then the system displays only GLs in the option list.
Note
- If amount block exists and TD account is force rolled, then Add Funds will be applicable on rollover.
- Add Funds is allowed only for auto rollover TDs. If it is opted for Close on Maturity or Unclaimed, the system displays an error as ‘Add funds feature is applicable only for rollover TDs’
- Even if one add pay in account does not have funds, then the rollover will fail.
- When TD account is topped up/ Redeemed the Add Amount populated for a special amount rollover TD will not be changed. It will be updated only when rollover amount is changed at rollover details subsystem.
- Add funds and Add amount can be specified at any time during the life-cycle of TD.TD ccount can be modified and additional amount can be provided.,
- When funds are insufficient the Add amount cannot be debited on rollover. and the rollover will fail. And will retire till the funds become available.
- When funds are available, then the TD account will be rolled with add funds with maturity date as value date.
- During Top-up if the TD amount becomes more than the rollover amount then for the excess of rollover amount less maturity amount will be paid out.
2.5.6 Specifying MIS Details
Enter MIS details by invoking the ‘Management Information System’ Screen. Click ‘MIS’ button to invoke this screen.
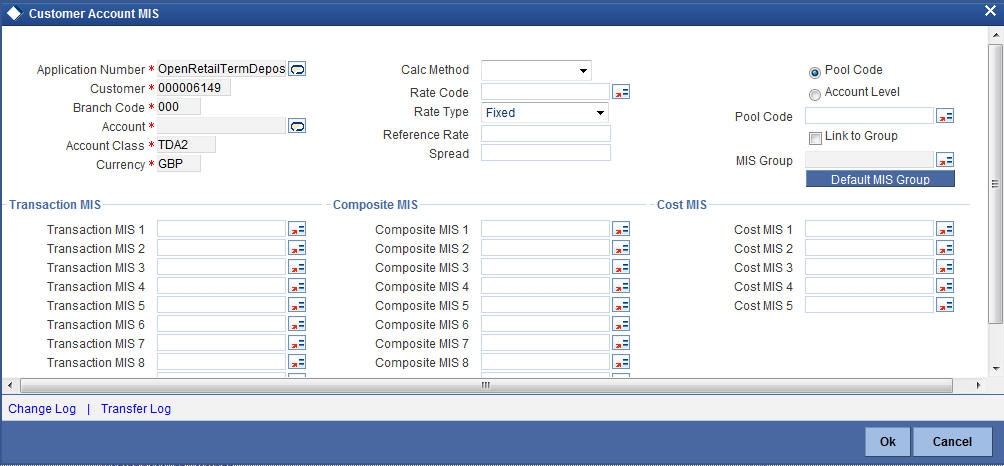
Refer the Management Information System User Manual for further details.
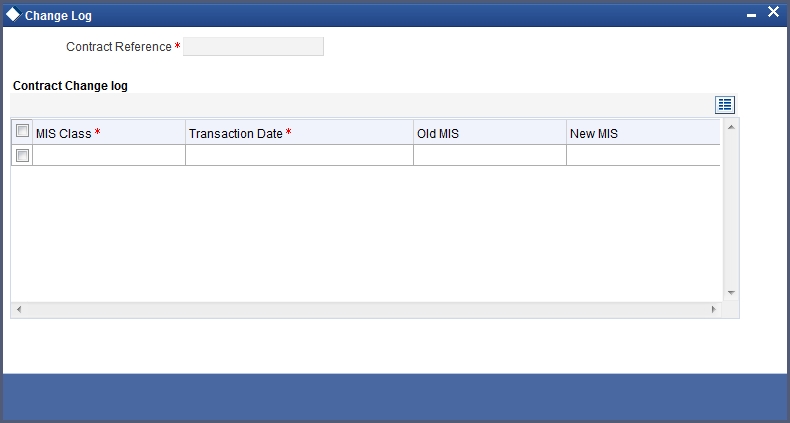
2.5.7 Viewing Change Log
Click ‘Change Log’ button to invoke ‘Change Log’ screen.
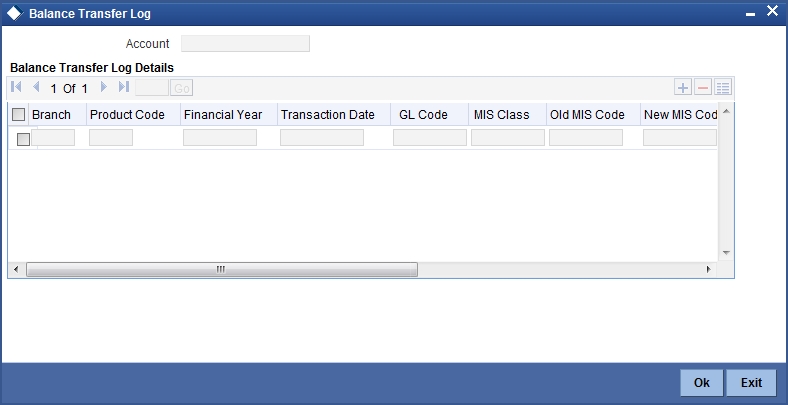
2.5.8 Viewing Balance Transfer Log
Click ‘Transfer Log’ button to invoke ‘Balance Transfer Log’ screen.
2.5.9 Specifying Interest Payout Details
You can pay out interest through demand draft, banker’s cheque or PC. To enable this, you need to capture the interest payout details using ‘Interest Payout Details’ screen. Click ‘Interest Payout Details’ button.
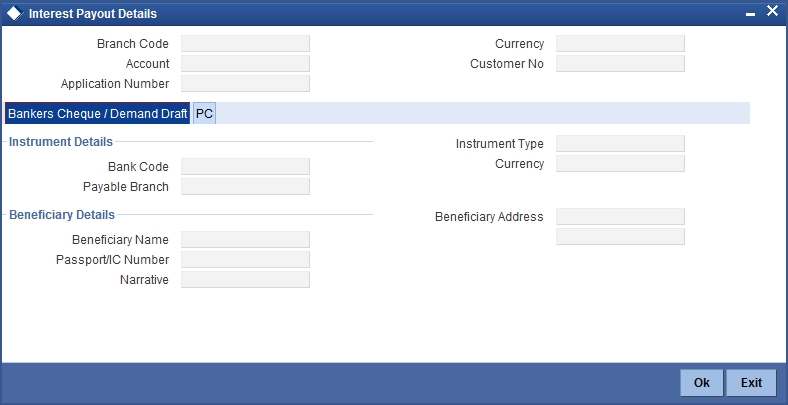
Specify the following details:
Branch Code
The system displays the branch code.
Account
The system displays the account number.
Currency
The system displays the currency code.
Interest Rate Based on Cumulative Amount
Check this box to indicate that the system should arrive at the interest rate of a new deposit using the cumulative amount of other active deposits, under the same account class, customer, and currency.
Rollover Interest Rate Based on Cumulative Amount
Check this box to indicate that the system should arrive at the rollover interest rate of a new deposit using the cumulative amount of other active deposits belonging to the same account class, customer, and currency.
2.5.9.1 Bankers Cheque / Demand Draft Tab
You need to specify the following details under this tab.
Instrument Details
Bank Code
Specify the bank code of the bank at which the demand draft/banker’s cheque was issued. The option list displays all valid bank codes maintained in the system. Choose the appropriate one.
Payable Branch
Specify the branch at which the demand draft/banker’s cheque is payable. The option list displays all valid branch codes of the selected bank. Choose the appropriate one.
Instrument Type
Specify the type of instrument used for interest payout.
Currency
Specify the currency in which the instrument is drawn.
Beneficiary Details
Beneficiary Name
Specify the name of the beneficiary of the demand draft/banker’s cheque.
Passport/IC Number
Specify the passport/IC number of the beneficiary of the demand draft/banker’s cheque.
Narrative
Enter the comments, if any.
Beneficiary Address
Specify the address of the beneficiary of the demand draft/banker’s cheque.
2.5.9.2 PC Tab
Click ‘PC’ tab to capture the details of PC.
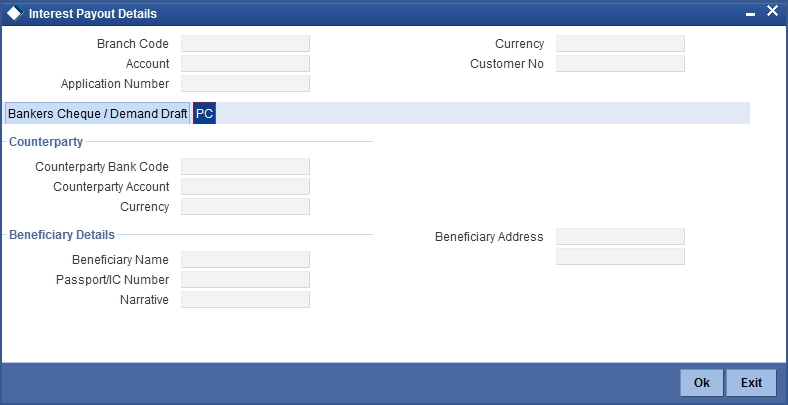
You need to specify the following details under this tab.
Counterparty
Counterparty Bank Code
Specify the bank code of the bank of the counterparty. The option list displays all valid bank codes maintained in the system. Choose the appropriate one.
Counterparty Account
Specify the account number of the counterparty. The option list displays all valid account numbers that are applicable. Choose the appropriate one.
Currency
The system displays the currency of the counterparty account.
Beneficiary Details
Beneficiary Name
Specify the name of the beneficiary of the PC.
Passport/IC Number
Specify the passport/IC number of the beneficiary of the PC.
Narrative
Enter the comments, if any.
Beneficiary Address
Specify the address of the beneficiary of the PC.
2.5.10 Capturing Primary Customer Details
Click ‘Primary Customer’ button to capture customer details. The following screen is displayed:
In this screen maintain the following customer details:
Customer Details
In this section, specify the basic information of the customer.
Local Branch
Specify the branch code of the customer’s local branch.
Customer Number
Specify the customer number for whom the current account is being created. You can also select the appropriate customer from the adjacent option list. The list displays all the valid and authorized customers maintained in the system.
External Reference
Specify the external reference number.
Short Name
Along with the Customer Code you have to capture the customer’s abbreviated name. The description that you capture is unique for each customer. It helps in conducting a quick alpha-search or generating queries regarding the customer.
Customer Name
The full name of the selected customer is displayed.
Customer Category
Specify the category in which the customer belongs. You can also select the appropriate customer category from the adjacent option list and indicate the category under which the particular customer is categorized. Each customer that you maintain can be categorized under any one of the categories that you have maintained in the system.
Existing Customer
If the customer is the existing customer, then this field is checked and you cannot edit the same.
2.5.11 Capturing Primary Customer Main Details
Click ‘Main’ tab to input the following contact details of the customer:
Contact Information
Address
Specify the address of the customer.
ZIP Code
Specify the ZIP code that forms a part of the contact address.
Country
Specify the country in which the customer resides. You can also select the appropriate country from the adjacent option list. The list displays a list of countries maintained in the system.
Mailers Required
Check this box to indicate whether the mailers required or not.
Statuses
Private Customer
Check this box to indicate that the customer is a private customer.
Permanent US Resident Status
Check this box to indicate that the corresponding director is a permanent US resident.
Visited US in last 3 years?
Check this box to indicate that the beneficial owner has visited US in the last three years.
Geographic
Resident Status
Indicate the customer’s resident status. The options are as given below:
- Resident
- Non Resident
National ID
Specify the national Id of the customer.
Nationality
Specify the nationality of the customer. You can also select the nationality of the customer from the adjacent option list. The list displays a list of countries maintained in the system.
Language
As part of maintaining customer accounts and transacting on behalf of your customer, you will need to send periodic updates to your customers in the form of advices, statement of accounts and so on.
Indicate the language in which your customer wants the statements and advices to be generated.
Power of Attorney
If the FATCA is enabled at the bank and the check box 'Power of Attorney' is checked here, then it is mandatory to specify the Power of Attorney information.
Power of Attorney
Check this box to indicate that the customer account is to be operated by the power of attorney holder.
Holder Name
The person who has been given the power of attorney.
Address
Specify the address of the power of attorney holder.
Country
Specify the country of the power of attorney holder.
Nationality
Specify the nationality of the power of attorney holder.
Telephone ISD Code +
Specify the international dialling code for the telephone number of the power of attorney holder. The adjoining option list displays valid ISD codes maintained in the system. Select the appropriate one.
Telephone Number
Specify the telephone number of the power of attorney holder.
Existing Bank Account Details
If the customer is an existing bank customer, then specify the following details:
Bank Name
Specify the name of the bank in which the customer is holding an account.
Branch Code
Indicate the name of the bank’s branch in which the customer is holding an account.
Account Type
Specify the type of account the customer is holding.
Account No
Specify the existing account number of the customer.
Visiting Frequency
Specify the number of times the customer visits or transacts with the existing bank.
2.5.12 Capturing Primary Customer Personal Details
Click ‘Personal’ tab to view the following given screen:

2.6 Verify Details of Input
In this stage, the bank verifies all the details entered to ensure correctness of information captured. In case the details captured are incorrect, the bank needs to make the necessary amendments. The function ID of this stage is ORDTDVER.
Select the desired record and click the adjoining ’Acquire’ button. The system displays the information message as "...xxx Accquire Successful"
The task will then be moved to your ‘Assigned’ task list. Double click on the record in your ‘Assigned’ task list. The following screen will be displayed.
The following screen will be displayed which is similar to the screen in the Input details stage.
The fields in the screen are disabled. The verifier is able to navigate to all tabs and verify data entered/corrected. The verifier can enter comments. In case the outcome selected is ‘Failed’ the process will move to the ‘Modify Input Details’ stage and in case the outcome selected is ‘Successful’, the task will then moved to the next activity once you click the ‘OK’ button in this screen.
2.7 Modify Details of Input
In this stage In case verification is not successful, the bank modifies the details captured. The function ID of this stage is ORDTDMFY.
Users belonging to the user role ROEROLE (Retail Operations Executive) can perform these activities.
In case verification is not successful, then you may need to modify few details. Go to the pending list in the system. The system displays all the pending activities. Click ‘Acquire’ button adjoining the required task to acquire it. The system displays the information message as "...xxx Accquire Successful"
If you have requisite rights, double click on the task in your ‘Assigned’ task list and invoke the following screen:
In this screen you can modify the editable fields. After modifying the required details, click save icon in the tool bar. You will be taken back to ‘Verify Details’ task. Click save icon in the tool bar to save the record. The system displays the message ‘The task is completed successfully’.
Click the ‘OK’ button in this screen. You will be taken back to the ‘Modify Details’ screen. Click ‘Exit’ button to exit the screen. The task is then moved to the next activity.
While saving the transaction, if you had modified the interest rate at TD account level for TD booking or for creating Payout TD, the system displays configurable override messages.
These overrides are displayed during subsequent modifications of the interest rate. You can also configure overrides for Dual Authorization to be displayed at Contract and Maintenance level in the ‘Override Maintenance’ (CSDOVDME) screen.
For more information about configuring overrides, refer to the section ‘Override Maintenance’ in the chapter ‘Configuring Overrides’ in the Core Services User Manual.
2.8 KYC (Retail) Review Info
This section contains the following topics:
- Section 2.8.1, "KYC (Retail) Review Info Stages"
- Section 2.8.2, "Verify Prospect /Customer Details"
- Section 2.8.3, "Ascertain if KYC Checks are Required"
- Section 2.8.4, "SDN Check"
- Section 2.8.5, "Verify SDN Match"
- Section 2.8.6, "Inform Regulatory / Internal Authorities on KYC Checks Failure"
- Section 2.8.7, "Internal Blacklist Check"
- Section 2.8.8, "Verify Customer / Prospect Contact Details"
- Section 2.8.9, "Other KYC Checks"
- Section 2.8.10, "KYC Decision"
2.8.1 KYC (Retail) Review Info Stages
This process includes checks like SDN check, internal blacklist check, contact details verification, etc. The account is opened only when the customer passes all these checks. In case of non-clearance of any of the checks, the account opening process is terminated. The bank verifies all the details/documents to ensure that the information / documents required to carry out KYC checks are obtained. In case the details captured are incorrect, the bank makes the necessary modifications. If the verification is successful, the bank proceeds to conduct KYC checks. Once KYC checks are carried out, the result is passed on to the parent process.
If any of the checks fail, the relevant regulatory /internal authorities are informed. Once KYC checks are carried out, the result is passed on to the parent process.
Here you perform the Know Your Customer check on the customer. The KYC check depends upon the regulatory environment within which your bank operates and its internal KYC policies.
Bank initiates the process of KYC-C review for a customer as a part of parent process with all the relevant information in the system. This process comprises the following stages:
- Verify prospect /customer details
- Ascertain if KYC checks are required
- SDN checks
- Verify SDN Match
- Inform Regulatory / Internal authorities on KYC checks failure
- Internal Black List check
- Verify customer / prospect contact details
- Other KYC Checks
- KYC Decision

2.8.2 Verify Prospect /Customer Details
Users belonging to the user role ‘KYCEROLE’ (KYC Executive) can perform these activities.
Go to the pending list in the system. The system displays all the pending activities. Click ‘Acquire’ button adjoining the ‘Sub-process KYC Review’ task to acquire it. The system displays the information message as "...xxx Accquire Successful"
If you have requisite rights, double click on the task in your ‘Assigned’ task list and invoke the following screen:

Click ‘Document’ button to invoke ‘Document Upload’ screen. The verifier will be able to update only remarks and upload documents that he might obtain in this stage.
You can view the customer details in this screen. If the customer information is complete, then select the outcome as ‘COMPLETE’ and save the record by clicking the save icon in the tool bar. The system displays the message ‘The task is completed successfully’.
The task is then moved to the next activity.
2.8.3 Ascertain if KYC Checks are Required
Users belonging to the user role ‘KYCMROLE’ (KYC Manager) can perform these activities.
In case of an existing customer, the bank checks if there are any changes to the existing KYC information already available with the bank. The KYC check for an existing customer is performed only if there are changes in the customer information (including details of nominee and mandate holder). In all other cases of new and existing customers, KYC checks are mandatory.
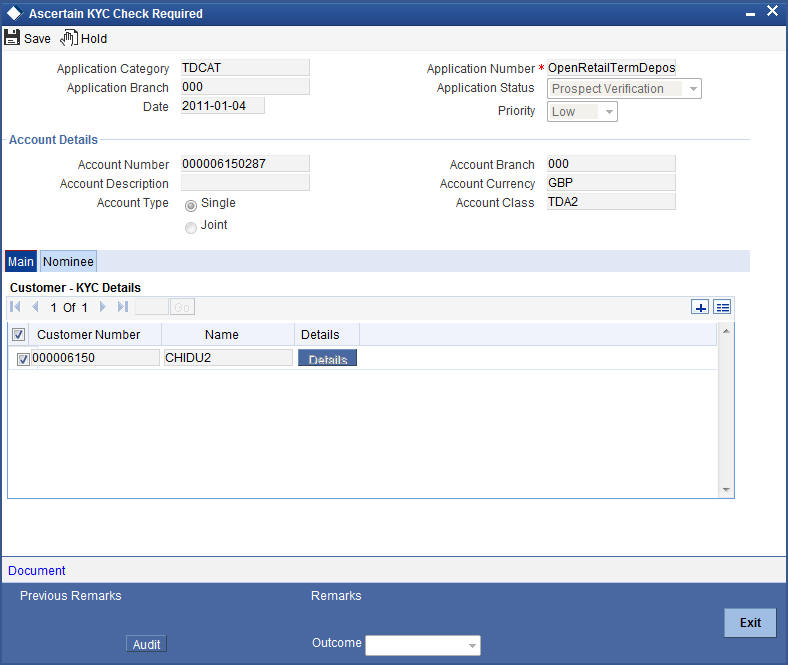
You can view the customer details and save the record by clicking the save icon in the tool bar. Outcome for this stage can either ‘REQUIRED’’ or ‘NOT REQUIRED’.
The system displays the message ‘The task is completed successfully’.
The task is then moved to the next activity.
2.8.4 SDN Check
In this stage, the bank checks the applicant’s name for terrorism-related black-listing against the SDN database maintained by the Office of Foreign Assets Control (OFAC). In case of a no match, the process proceeds. In case of a match (positive/partial), you can verify the match again using the OFAC guidelines.
A system Task is created which invokes the external service to do the SDN check for all new applicants and any existing customers whose information is modified. All nominee details are also sent for SDN check.
2.8.5 Verify SDN Match
The bank checks the applicant’s name for terrorism-related black-listing against the SDN database maintained by the Office of Foreign Assets Control (OFAC). In case of a no match, the process proceeds. In case of a match (positive/partial), you can verify the match again using the OFAC guidelines.
Users belonging to the user role ‘KYCMROLE’ (KYC Manager) can perform these activities.
Go to the ‘Assigned’ queue in the system. Click ‘Acquire’ button adjoining the ‘Verify Partial Match’ task to acquire it. The system displays the message ‘The task is completed successfully’.
If you have requisite rights, double click on the task in your ‘Assigned’ task list and invoke the following screen:
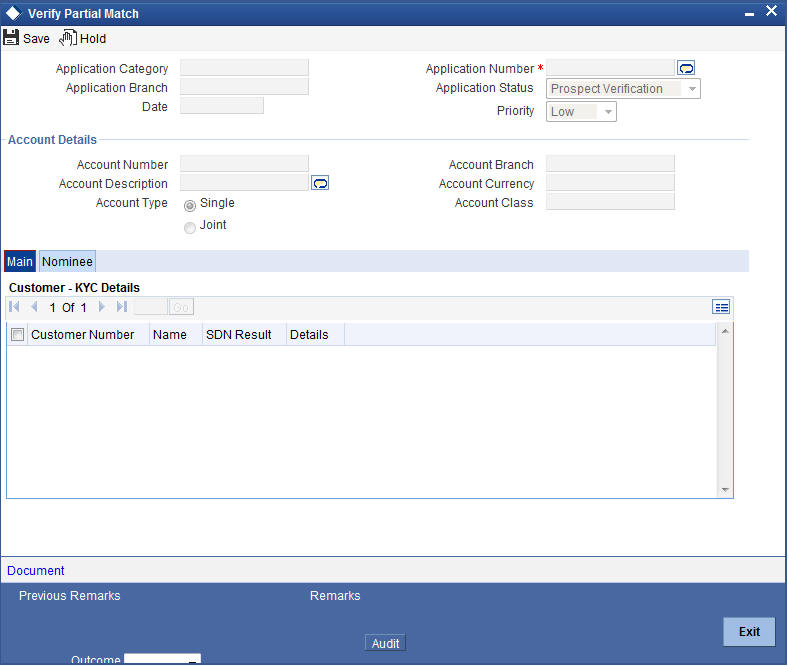
In this screen, you can view the applicant’s details. In case of a positive SDN match, the bank informs the regulatory agency (OFAC or any other similar agency) about the SDN match of the prospect/customer. However, if the match is cleared, you can continue with the subsequent KYC checks. Save the record by clicking the save icon in the tool bar. The Outcomes for this stage are ‘Cleared’, ‘Not Cleared’. The system displays the message ‘The task is completed successfully’.
Click ‘Ok’ button. The task is then moved to the next activity.
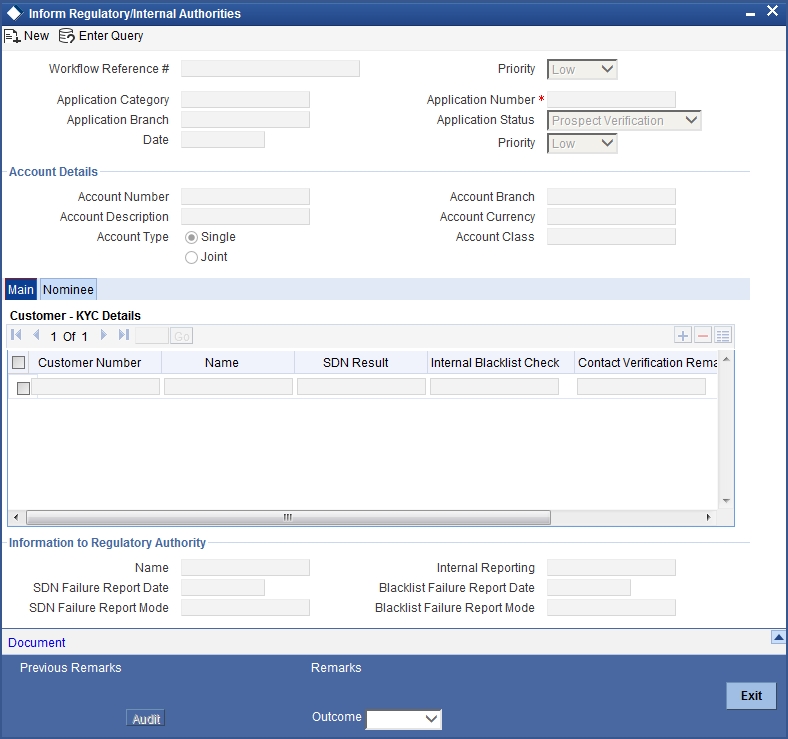
2.8.6 Inform Regulatory / Internal Authorities on KYC Checks Failure
In case of a positive SDN match, the bank informs the regulatory agency (OFAC or any other similar agency) about the SDN match of the prospect/customer. The bank may also inform its internal authorities in case of positive SDN match and/or if the prospect/customer is blacklisted internally.
Users belonging to the user role ‘KYCMROLE’ (KYC Manager) can perform these activities.
2.8.7 Internal Blacklist Check
Users belonging to the user role ‘KYCEROLE’ (KYC Executive) can perform these activities.
Go to the pending list in the system. The system displays all the pending activities. Click ‘Acquire’ button adjoining the ‘Internal Blacklist Check’ task to acquire it. The system displays the message ‘The task is completed successfully’.
If you have requisite rights, double click on the task in your ‘Assigned’ task list.
Click ‘Internal Blacklist Check’ button to invoke ‘Blacklist Check’ screen. The verifier will be able to update only remarks and upload documents that he might obtain in this stage.
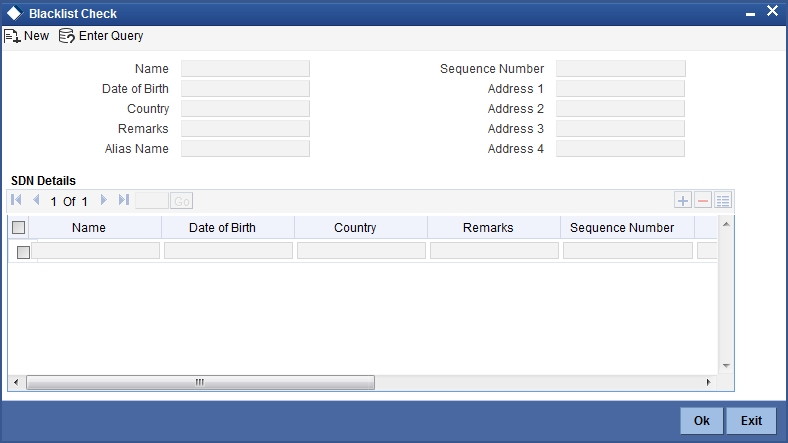
In this screen, you can view the applicant’s details. If the applicant’s name is listed in the bank's internal list of global blacklisted customers, you can report it to the internal authorities of the bank. You can continue with the process of creating account only when the customer passes these checks. The outcomes for this stage are ‘PROCEED’ and ‘REJECT’. Select the outcome as ‘PROCEED’ and save the record by clicking the save icon in the tool bar. If the customer clears the check . In case the customer is a blacklisted customer select the outcome as ‘REJECT’ The system then will move to Inform Regulatory Authorities Stage. The system displays the message ‘The task is completed successfully’.
Click ‘Ok’ button. The task is then moved to the next activity.
2.8.8 Verify Customer / Prospect Contact Details
Users belonging to the user role ‘KYCEROLE’ (KYC Executive) can perform these activities.
Go to the pending list in the system. The system displays all the pending activities. Click ‘Acquire’ button adjoining the ‘Internal Blacklist Check’ task to acquire it. The system displays the message ‘The task is completed successfully’.
If you have requisite rights, double click on the task in your ‘Assigned’ task list and invoke the following screen:
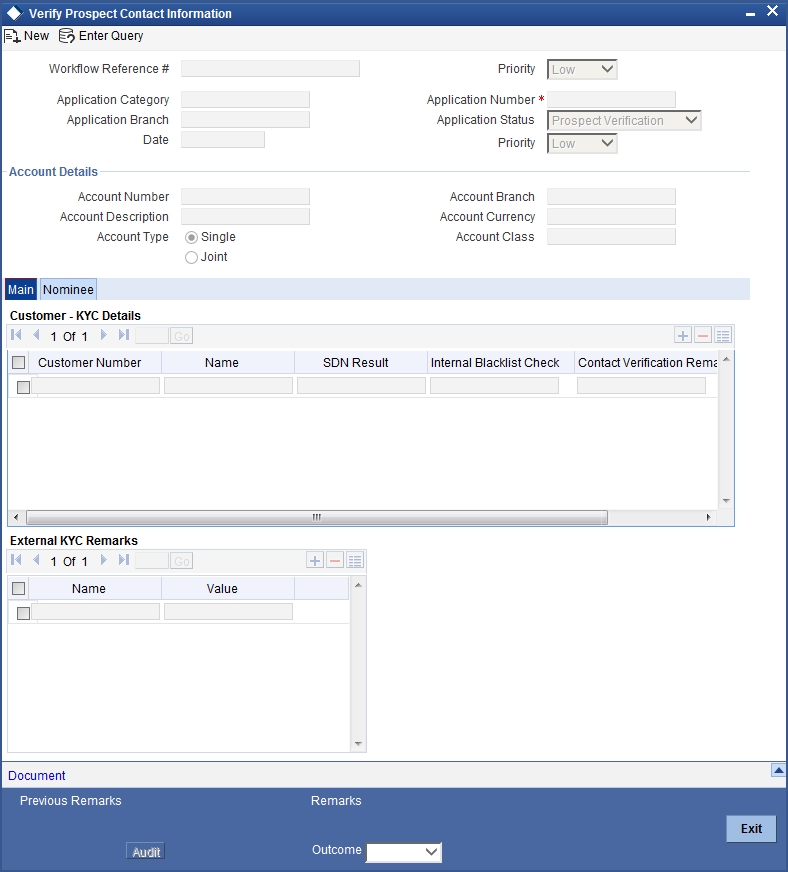
In this screen, you can view the applicant’s details. As per the bank’s mandated policy, you will have to perform the customer identification check. This involves verification of customer address, phone number etc. The outcome of the various stages is displayed in the Audit block for the verifier to make a decision. The outcomes for this stage are ‘PROCEED ‘ and ‘REJECT’ After selecting the outcome save the record by clicking on the save icon of the tool bar. The system displays the message ‘The task is completed successfully’.
Click ‘Ok’ button. You will be taken back to the ‘Verify Prospect Contact Details’ screen. Click ‘Exit’ button to exit the screen. The task is then moved to the next activity.
2.8.9 Other KYC Checks
As per the bank’s mandated policy, you will have to other details like verification of the employer information, verification of the income information, sources and uses of funds etc.
Users belonging to the user role ‘KYCEROLE’ (KYC Executive) can perform these activities.
Go to the pending list in the system. The system displays all the pending activities. Click ‘Acquire’ button adjoining the ‘OtherKYCChecks’ task to acquire it. The system displays the message ‘The task is completed successfully’.
If you have requisite rights, double click on the task in your ‘Assigned’ task list and invoke the following screen:
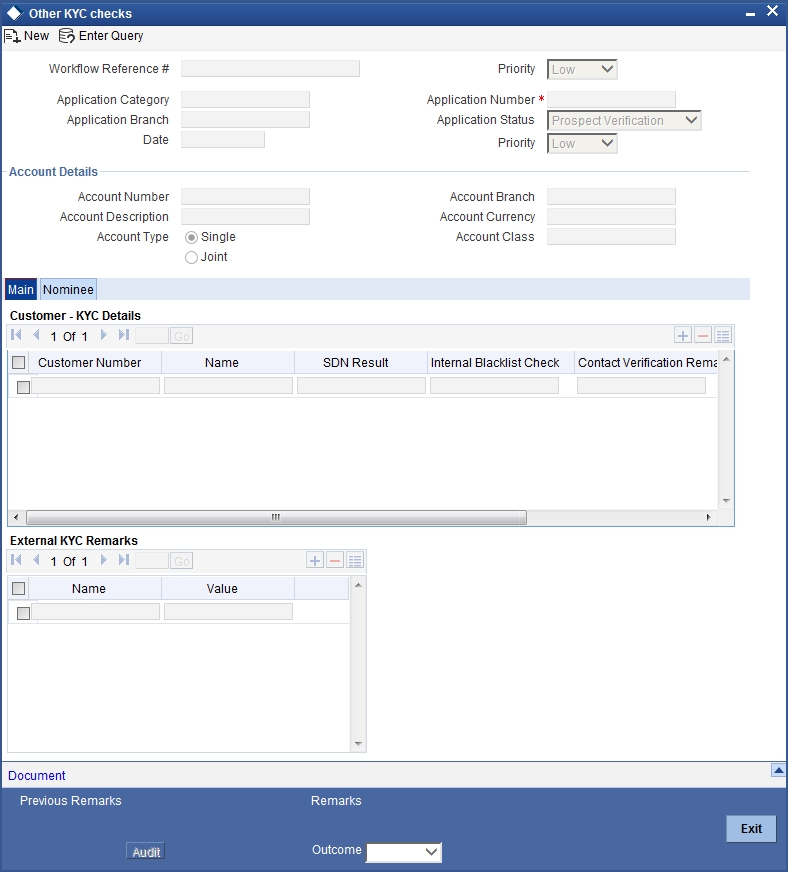
In this screen, you can view and verify the applicant’s details. After verifying the details, select the outcome as ‘PROCEED’ and save the record by clicking the save icon in the tool bar. The system displays the message ‘The task is completed successfully’.
Click ‘Ok’ button. The task is then moved to the next activity.
2.8.10 KYC Decision
After verifying and evaluating the KYC information, bank decides whether it should enter into a relationship with the prospect/continue relationship (in case of an existing relationship) or not.
Users belonging to the user role ‘KYCMROLE’ (KYC Manager) can perform these activities.
Go to the pending list in the system. The system displays all the pending activities. Click ‘Acquire’ button adjoining the ‘KYCDecision’ task to acquire it. The system displays the message ‘The task is completed successfully’.
If you have requisite rights, double click on the task in your ‘Assigned’ task list and invoke the following screen:
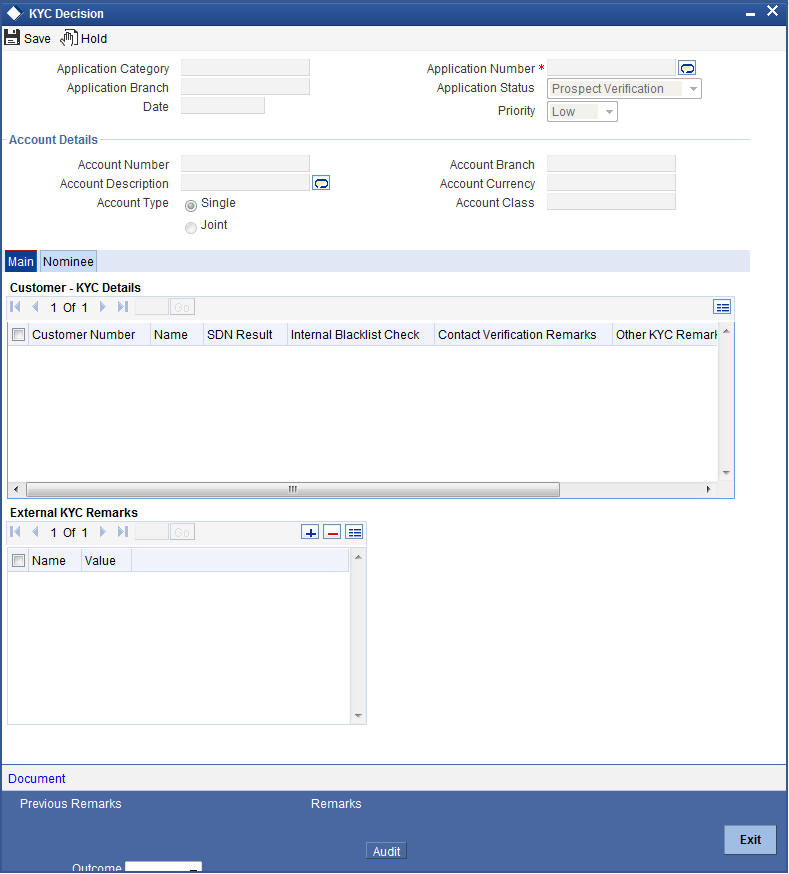
In this screen, you can view the complete information of the applicant. The outcome of various stages of KYC-R sub process is displayed in the Audit block. Based on these information, you can inform the customer if you enter into a relationship with the prospect/continue relationship (in case of an existing relationship) or not as part of the parent process.
Based on the decision, select the outcome as ‘FAILED’ or ‘PASSED’ and save the record by clicking the save icon in the tool bar. The system displays the message ‘The task is completed successfully’.
Click ‘Ok’ button. The task is then moved to the Main process.
2.9 Block Customer in the System
For an existing customer if the KYC check fails, then the system will block all the existing accounts for the customer as per the bank's internal guidelines. The failed customers will be added into the internal backlist database.
2.10 Generate Advice of Rejection of Request for Opening TD
In this stage, the bank generates term deposit receipt / confirmation advice mentioning the complete details of the term deposit opened by the bank.
2.11 Dispatch Advice of Rejection
In this stage, the bank dispatches the advice of rejection to the prospect. The documents obtained along with the deposit opening form, if any, are also returned as part of this activity.
Users belonging to the user role ROEROLE (Retail Operations Executive) can perform these activities.
2.12 Check if Funds are Available for Opening TD Account
In this stage, the bank checks whether the funds are available for opening the term deposit account. In case the deposit amount is by way of cash/cheque, the bank checks the appropriate settlement account to confirm receipt of deposit amount. In case the deposit amount is by way of transfer from another account of the bank, the bank checks the account balance.
Users belonging to the user role ROEROLE (Retail Operations Executive) can perform these activities.
2.13 Create Customer / Modify Customer Details in the System
If the applicant is a new customer, then a new customer record is created in the system. In case of an existing customer, the customer's KYC information is updated. Similarly, if a joint account is opened where multiple customer IDs need to be created/updated, then the same is done in the system as part of this activity.
2.14 Book Term Deposit
In this stage, the bank creates the term deposit in Oracle FLEXCUBE and also links it to the customer ID. In case of a deposit in joint names, the bank links all the applicable customer IDs to the deposit account.
2.15 Generate Term Deposit Receipt / Confirmation Advice
In this stage, the bank generates term deposit receipt / confirmation advice mentioning the complete details of the term deposit opened by the bank.
2.16 Store Document Reference Number in the System
The bank stores the document reference in Oracle FLEXCUBE for future reference. The documents that are captured and uploaded into the DMS system generates a reference number which are linked to the contract reference number and saved in Oracle FLEXCUBE for future reference.
2.17 Dispatch Confirmation Advice and Store Documents
In this stage, the bank dispatches / hands over the term deposit receipt/ confirmation advice to the customer. The bank stores the deposit opening form and other supporting documents in a safe and accessible location.
The bank also captures:
- The details of the documents stored
- While storing, the bank ensures that all the required documents (as per the bank's policy) are available in the storage
Users belonging to the user role ROEROLE (Retail Operations Executive) can perform these activities.
You can store the current account opening form and other supporting documents are stored in a safe and accessible location. This storage information can be recorded using ‘Store Documents’ screen. You can capture the storage details in this stage.
Click ‘Acquire’ button adjoining the ‘Store Documents’ task to acquire it. The system displays the message ‘The task is completed successfully’.
If you have requisite rights, double click on the task in your ‘Assigned’ task list and invoke the following screen.
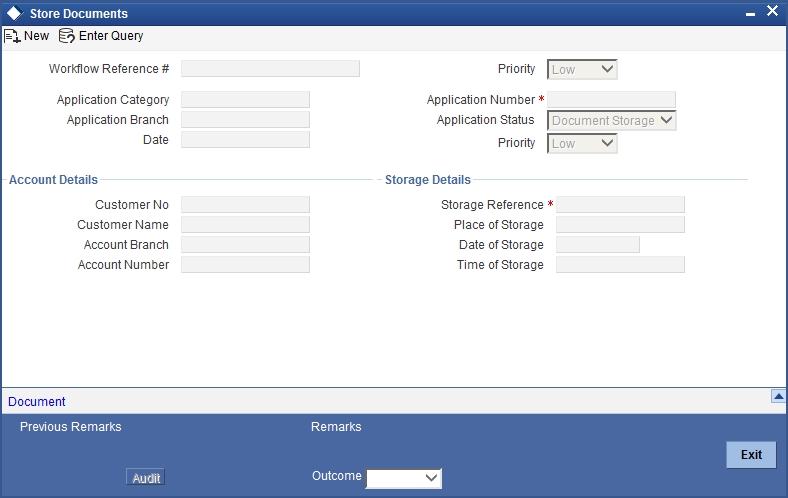
In this screen the following information can be stored:
Account Details
The following customer information is displayed:
- Customer Number
- Customer Name
- Branch
- Account Number
Storage Details
Capture the following storage details in this section:
Storage Reference Number
Specify the storage reference number.
Place of Storage
Specify the place where the document is stored.
Date of Storage
Specify the date on which the documents were stored.
Time of Storage
Specify the time of document storage.
Select the action ‘Document Stored’ in the textbox adjoining the ‘Audit’ button in this screen and save the record by clicking the save icon in the tool bar. The system displays the message ‘The task is completed successfully’.
Click ‘Ok’ button.
2.18 Limit Validation for TD Opening
The Input and authorization limit set up for a user for different currencies in ‘SMDRLMNE – Role Limits Maintenance’ is validated for Term Deposit transactions made through the following fast path.
- ORDTDINP - Input limit to be validated
At the time of input/authorization of a deposit transaction, if there is a breach of limit then system displays a configurable override message.